Monday, February 26, 2018

2018 #3 Watercolours with EEA {by Ellie Knol}

2018 Topic 3: Watercolour

This also a book in my own series 52, a book a week! Week 8 - Book 8


 I'd like to share with you how to use  your beautiful watercolored paper. I LOVE how watercolor always make for beautiful backgrounds... 

I've altered a hard board baby book into a colorful booklet.. a feast for the eye. 


A picture I grabbed from the internet, to show you what it looks like: it has rather thick boards, which I liked for this purpose. 

These books (I have more) have been in my stash for quite a while, waiting for me to get the moment of light to create something with it. 
I removed all of the top (glossy) paper of the booklet, which leaves you with a blank booklet; you will now have to reinforce the spine with a piece of fabric.  


Before doing anything to change the booklet, I painted the outsides with Snowflake Fresco Finish paint, also the outside of the pages; closing it tightly first will help not getting any paint on the pages itself. Also make sure you add paint to the fabric on the spine.  


I've added pieces of shells which hang down with some knotted thread. The shells were colored with a bit of alcohol ink.

I've added structure paste randomly to the spine to cover the fabric partially. It gives it some structure and covers the part where I attached the threads with knots; makes it look as if it's supposed to look like this, hehe.  


The stencil with numbers PS021 and structure paste was used to make the no 1 on the spine.. you never know, I might want to create a second book in near future. 
I painted the number and spine yellowish (just here and there) with Yellow Submarine Fresco Finish Chalk Acrylic paint to match the yellow color in the background. 


OK.. this post was about watercolors.. right? 

I've created a larger piece of a background on watercolor paper with a technique where you use white glue to create a resist. Any pattern will do, and I experimented with stampiing with white glue, I used a stencil to create patterns, and splattered the glue as well... the sky is the limit here. 


Let the glue dry properly before adding color. I've used Ecoline in spraybottles, but any watercolor spray will do the job, or water-diluted transluscent Fresco Finish paints or even the normal watercolors. 


As you can see here, I've used salt in the wet watercolors to create little dots of color. 

Cut the background up to fit the pages and front and back cover of the booklet. 

I adhered it to the book with bookbinding glue. 


AND.. yes I had to use some stamping!! 
These beautiful and versatile stamps from Everything Art EEA01 are great for this. They're really great to add as background stamping. 
I've stamped it all with Archival black ink. 


I've added white highlights with a white acrylic marker around the stamping, and also in the background ! To me that adds the final touch!! 


A picture of the overall of the booklet. I would've liked to be able to photograph all sides at once, as I really LOVE how this has turned out.  


I especially like how the back cover has turned out.. the contrast between lighter and darker colors, but also the stamping around the edges. Guess what stamp I've used for that? Yes, part of the collaged stamp in set EEA01


****

I will teach 2 workshops early March at my home; 
... you can find details on my workshop blog: Kom spelen met papier, kleur en stempels!  

Saturday, February 24, 2018

Magenta meets Distress Oxide !!


A step-by step tutorial from me, Ellie, today! 

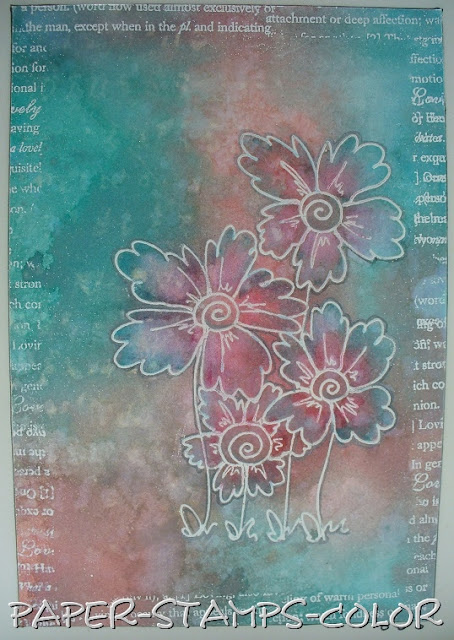
Stamp and heat emboss the beautiful flower with white embossing powder. Sponge with Distress Oxide ink to the background.

Mist some water onto your craftsheet, en press the background into the water.
Dry and press it down in the water until you're satisfied with the result. 


You get a mottled effect, and the ink colors mix a little too! 


Wet the petals with a brush and dab away some color. 


Add some extra colors to the edges of the flowers with a watercolor pencil to make them pop a little more.


The finished card;
I've added a border of white heat embossed script
 (LOVE definition) to frame the image before assembling it. 


A close- up..
I've stamped the Distressed Background Stamp into the background with water, and dabbed some color away; it creates watermarks in the inks. 


You can see the watermarks better on this last photo! 


Hope you like the inspiration!!

Ellie Knol - DT Magenta

*****

Produits Magenta utilisés:
Magenta products used:


Friday, February 23, 2018

Book 7 - for series 52


week 7 : book 7. 

This time an easy book.. folded scrapbook paper and the backsides of it glued together .. 

It measures 15 x15 centimeters. 
I've also used scrapbook paper for the covers, made from sturdy not too thick cardboard. 


Friday, February 16, 2018

Book 6 - for series 52


week 6 : book 6. 

I am also entering this in the challenge on
1. Mini Album Makers 


This time a domino book with stamped butterflies.. 


... it's got a ribbon he back so I can just pull the ribbon to close the book ..


Thursday, February 15, 2018

JAAAAAAAA... ik kan weer lekker verder knutselen...

... voor Hobbycompleet De Duif.
Mijn eerste officiele bijdrage, alhoewel ik wel al eerder heb gemaakt maar dat mag ik nog niet laten zien.. dat komt nog.. 

Een art journal pagina met natuurlijk een van mijn eigen stempeldesigns, de Distressed Background Text uitgebracht door Magenta, en de mooie stempels van Jofy (JOFY52), op een achtergrond gemaakt op de Gelli plate met de Fresco Finish Paints van Paper Artsy. Ik gebruikte de Granny Smith, Mermaid en Lavender...


I am also entering this in the challenge :
1. A vintage Journey - melt it (the text was heat embossed in white)

Thursday, February 8, 2018

Art journaling is relaxing !!


I had a nice play in my smaller art journal booklet..
...with one of my favorite stencils! 


Magenta products used:


Wednesday, February 7, 2018

Book 5 - for series 52


week 5 : book 5. 

This time a booklet from 17 envellopes.. 

It measures 12 x 18,5 centimeters. 


The envellopes can be used as pockets to keep photographs, or labels, or anything that you'd like to save as a keepsake. 


This is really a way to bind that I've come up with all by myself.. trial and error made it perfect in the end. I might come up with a workshop about making it, so I will not share more details about it.

AND remember... this series is about me, and myself, and not for a DT, so bare with me not sharing too much info anyway.


Hope you like it!!

Please leave a comment if you do.. that inspires me to make more :)

I am entering this in the challenge on:

1 Happy Little Stampers - butterflies
2. A vintage Journey - melt it
3. Mini Album Makers