Showing posts with label altered art. Show all posts

Wednesday, January 22, 2020

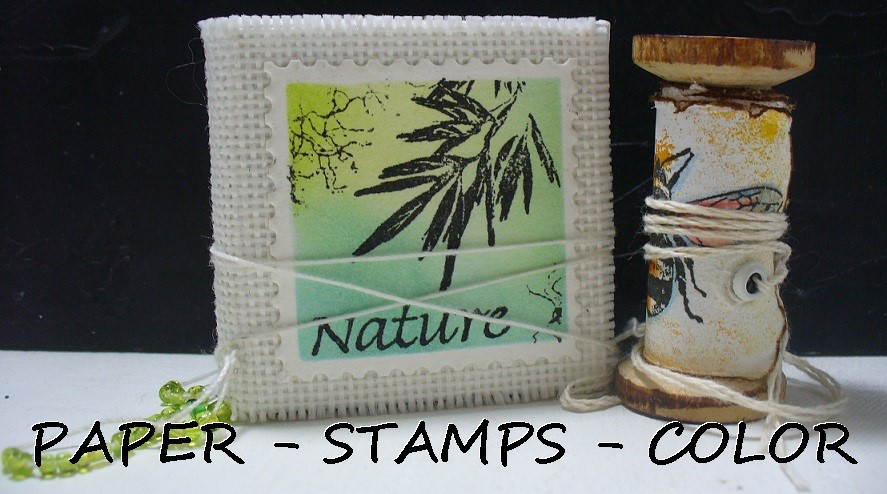
IENIEMINIE - TINY Art - book 27

I am entering this in the challenge from Art Journey - AJC #108 ienieminie/ tiny art 


I have wanted to create a book like this for a long time now, and decided to make it now for the challenge of Art Journey.


I used a torn piece of gelliprinted paper to be the 'page', and stamped all the images from the INSECTS stamp set.


This is also a book in my series of bookmaking for series 52:
For further info on this series : see this post

 book 27 
This time a book with a spool and stamped images on the paper. 

Here are some photographs of book 26 and 27: 


Sunday, November 4, 2018

2018 #19 Tissue Paper: Happy Tulips with ECF {by Ellie Knol}

2018 Topic 17: Tissue Paper

I am up on the Paper Artsy blog tonight..
go check and find all the info on how I did this.

Every fortnight Paper Artsy has a theme on their blog
 and several DT members show their take on the theme during the fortnight;
what's more, there is a challenge too, and a prize to be won of course! 


The embellishments were made with clay, and some of them stamped into while still wet.

This fortnight the theme is TISSUE PAPER!!
LOVE to work with it!!

Friday, March 30, 2018

2018 #5 Nautical Colours: Heart shaped home decor with EDY

 Topic 5:  Nautical Colours


Hi everyone, I am up on the PA blog tonight;
 and I'd like to share with you the altering of a wooden heart that measures 19 x 20,5 centimeters.. 

I chose to do it in a heart shape as the stamp set has some heart shapes too, and to me those two seem to be in love; and nautical colors includes red. 


I did a lot of collaging including some pictures I had in my stash.. they are close to be drawn, some watercolors I think. 
I tried to collage them in such a way that it all blends in 

Why the sea? Yes.. nautical has everything to do with the sea.. of course.. 
The tree and heart shapes from the EDY20 stamp set have been stamped onto tissue paper, but the main images were stamped on cardstock and fussy cut. 


I've made the fishing net myself, while enjoying a cup of coffee with my family this morning... first one.. I will need to do this more to get it more even, and use it in my crafting, but for now this will have to do, hehe. 


Thursday, August 31, 2017

Fragile!


Hi all Art Anthology fans,

I have a project today that I've started during my vacation... dried stems and flowers to make some home-decor with. They've been waiting, together with the gesso-primed MDF in a droplet-like shape.

To see more... please visit the post on the Art Anthology website, as I have to go to a meeting in 10 minutes' time and can save some time by not writing out the post here as well. Art Anthology has a Wordpress site, so I cannot just copy and paste text to Blogger.. ..

a sneak peek: 

I hope to see you on the Art Anthology blog.. there's also a step by step in a Snapguide!
...AND please leave me a comment there if you get inspired! Thanks, it's much appreciated. 

Saturday, August 19, 2017

Altered art?!

A little gift .. .as a thank you to a friend.
The feathers are from chickens from this friend.
I made this during our holiday... with found feathers at our accomodation.
I scored the bread board and the pebbles during one of our outings to thrift stores. 

Easy to do .. on any surface or any substrate. 


I (Ellie), would love it if you would take the time to have a look at the step-by-step in the Snapguide;
just for you AA fans...

Check out How to Do an Easy Altered Art Project With Found Objects by Art Anthology on Snapguide.


...  and be inspired of course!


Please show us what you've made on our
Please tag me and I'll come visit!


****

The project in an early stage:
(LOVE these stencils!)


AND a close-up of the finished project:


AND a few pictures of the finished project on the wall.

Enjoy!


I made a lot of different pictures, because I knew I was not going to be able to photograph this at home. Here a funny one: the project with a lot of glass pebbles and tissue wrap, to get you in the mood! (grin)


Enjoy your day, and happy crafting until next time!!


****
If you need more inspiration check out Art Anthology
on Pinterest and YouTube
You can shop for everything used in this tutorial at Art Anthology’s online store.

Art Anthology Products Used:


Wednesday, May 17, 2017

Newborn wall hanger - for my grandson..

I am up on the Art Anthology blog again today..
...  with a wall hanger for a newborn baby. 

To save myself some time ....
(I'll have to get ready now for teaching tomorrow...) 
... for the full project and a step-by-step Snapguide tutorial,
please see the post on the Art Anthology blog.

****
I am entering this in the challenge on 
1. Stamps and Stencils - fabrics and Fibres


****


Thursday, May 4, 2017

Home decor time !


I am happy to be with you today sharing a piece of home decor 
made with the beautiful Colorations Sprays and a stencil from Art Anthology. 


I think this will be gifted to someone in near future; only if I can part with it, lol!


I am entering this in the challenge on Simons Says Stamp - the great ourdoors

****

Starting off with a slab of wood...


... and playing with gesso, ephemera, structure paste and a stencil ....


... and some Colorations Sprays ...


... will give you an artsy gift!

I'm happy I could share this with you and I hope you will give this a try.

I've also created a step-by-step Snapguide tutorial for you:

Friday, April 28, 2017

Paper Artsy - Blue and ochre with found objects

FUN theme this time at Paper Artsy! The theme and colors spoke to me, also my newest stencil and the new stamps from Lin Brown, ELB33. 
I always tend to come back to nature, and had to use that element in my project too! 
So five elements that got me inspired. 

Theme, color, stamps, a stencil and nature! 


LOOK what I came up with, just a sneak peek!! 
 It took me a whole day to get this together... with lots of finds of years and years from nature..
seashells, the tiniest tiny ones (thinking of sitting in hot sand with my daughter Karlien when she was still a girlie) ...
and a worn leaf...
seedheads...
also some rusted keys..
and to frame it all I used some branches from a pear tree. 

GO see the post on the Paper Artsy blog for the whole project and more photographs .. and also description of the different finds.

****

I am entering this in the challenge on
1. Country View Challenges - rust

Thursday, July 14, 2016

3UP July 2016 for Paper Artsy!

You know me by now, I think...
I like challenges.
It makes me have to think outside the box. 
SO, when I saw this 3UP challenge for July, I thought - why not? 
When I received the to-be-used stamps, I saw - to my astonishment -  that they are Lynn Perella stamps.
How on earth was I going to use these?!
They are so different to any style of stamps I have ever used!
I really prefer nature related stamps!

sigh  
 

BUT, to be honest.. I amazed myself in finishing this project so fast, and it was such fun, that I am now really feeling different about this type of stamps. I couldn't have imagined that!! 

The difficulty about receiving a package is also, that you have to limit yourself to just that product, and the color it contains. 

After making a list of possible techniques, objects and materials I could add, I went with the flow, and was SO happy!  
Yes, I always tend to do difficult things first, rightaway, haha. 

I started by making backgrounds with the different colors of Infusions, 2 reds, a blue and yellow, tried do some mixing as well. 
The blue had my preference immediately. If you go through the writing in the description of the steps you will discover why, I'm sure! 


The finished project- an altered CD-tin and CD:
I still need to add some music to the CD; from Vivaldi, or Bach maybe?!


**** 

Start by heat embossing the woman with black, and the orrnament stamp with white.  


The heat embossing acts as a resist for the color. Before adding the Infusion powder, cover any surfaces that you want to keep white, like the face, with a medium; I've used Teykol. Goosebunos or even matte medium will work too!
Sprinkle a tiny bit of the Infusion powder onto the surface, not covering the whole of it!  
Mist water over it, and use a brush to manipulate the colors to blend a little (upper part of background, or leave the water alone to do it's job all by itself (lower part of the background). 


Let the puddles run, by tilting the card. When dry, clean up the face and other areas you've covered with medium; and also the white heat embossing. Use a dry cloth, as otherwise the Infusions will react to the wetness. 
I LOVE all the different colors in the Royal Blood Infusions; 
from purple to deep blue, and even some greenish teal tints.
 Cut it out to fit the tin.


Add white heat embossing to the edges of the tin. Add background stamping; I've used a script stamp and a bubble stamp. I added color to the bubbles with a watercolor pencil.  
 

Make a second background, and stamp only the woman, not the ornament, and leave out the heat embossing of it. Also add a second-generation stamping of the woman on the left habd side of the CD background. Stamp with the same script stamp as used on the lid of the tin. Cut it to size and adhere to the CD.


****

Some more photo's !


I am entering this in the challenge on
1. A vintage journey - monochromatic

Saturday, April 9, 2016

An altered box...

I have a tutorial up on The Crafter's Workshop website today - how to alter a wooden box, this time I've used an empty cigar box. 

A sneak peek... for the full tutorial, go see the TCW website. 


PS .... #TCWStencillove is the keyword on social media for TCW stencils. 

Friday, March 18, 2016

Giant puzzle piece tutorial ...


A tutorial from me on The Crafter´s Workshop website. 
Only a sneak peek here... for the step by step tutorial please go see the TCW website. 


Saturday, July 25, 2015

An altered butterfly book...

Today I'd like to share how to easily change the cover of a dummy book!
You can find this post on the The Crafter's Workshop blog, too!
This is how it turned out: 
 
****
A step by step tutorial:

Start by sanding the cover really well to get rid of the gloss, and so the gesso in the next step will have some grip to it .   
  Paint the cover with white gesso, front and back!  Leave to dry...


 Paint the cover with brown acrylic paint... it doesn't have to be all covered, 
a distressed feel to it is OK. Leave to dry. 
Paint the cover with (quick) crackle medium. Leave to dry. 
   Paint the cover with white acrylic paint, it will immediately start to crack, so add your paint in one streak, don't go over the same spot twice. It doesn't matter if the paint doesn't get on evenly, it adds to the distressed feel of it!
Leave to dry... 


 Spray some color onto the book. I used a custom made pearl spray. Leave to dry. 


Stamp some script (Magenta Style) onto the cover with a black permanent ink. 


   And now for the fun part: 
Add structure to the cover with the Butterfly Collage stencil : 
add structure paste with a palette knife.   
Leave to dry.


 LOVE this stencil, I will be using this one a lot! 
Hope you like it!
****
STENCIL USED:
TCW554 Butterfly Collage 6x6