Showing posts with label resist. Show all posts

Tuesday, September 24, 2019

Guest designer for Rubberdance - 2


I have another guest designer blogpost up on the Rubberdance blog today...

go check it out... what you see here is stamped and colored fabric..

Monday, May 6, 2019

My Creative Monday for Magenta - heat emboss resist 2

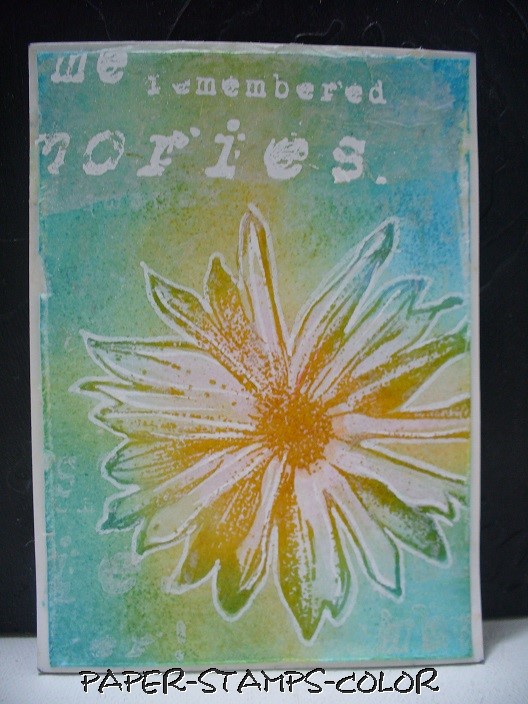
The second heat emboss resist technique as promised last week!

AND as I love flowers I am also entering this technique in the monthly challenge of The Flower Challenge, which is embossing this month.


I've made an ATC to test the technique.. 

1. Sponge a piece of cardstock with distress ink. Dry thoroughly!
2. Stamp images with Versamark and heat emboss with clear embossing powder.
3. Tape a second piece of cardstock to the first so it folds the inked sides to the inside.
4. Mist the inked one with water.
5. Close the two pieces of cardstock and put it stacked through an embossing machine, like a Big Shot.
6. Now you've got 2 backgrounds with color, the first one has the sponged color trapped under the heat embossing.
7. Mask the images and heat emboss a script in white to finish it off.

Now for the technique used on a background for a card. 


The colors are deeper with this version of the technique.. WHY? Because I did not cover the cardstock with gesso first!! 


Magenta products used:


Monday, February 11, 2019

Dahlia flower stamp ... and a TIP ...3!


Kleuren met Nuance poeders..  methode 2 (er zijn vast nog wel meer methodes)
Stempel de Dahlia collage stempel van Stampendous met Versamark en heat emboss het met WOW wit embossing poeder.
Sprenkel de Nuance poeders over de afbeelding (liever eerst weinig)... rood, geel en oranje (zo ongeveer) over de bloemen en blauw, paars en groen over de gedeeltes om de bloem heen.
Let er wel op dat je de complementaire kleuren niet over elkaar aanbrengt anders krijg je bruinerige kleuren!
Spray het met water, zodat de kleuren opgelost zijn en gaan mengen, maar ook weer niet te nat. Sprenkel er eventueel nog wat poeder bij waar het niet genoeg is.
TIP: Leg er huishoudfolie op en laat het aan de lucht drogen.
Breng met een aquarelmarker of -potlood iets meer kleur aan op de snijpunten van de afbeelding, om de afbeelding net iets meer te accentueren.

Coloring with Nuance powders.. method 2 (there are way more methods) 
Stamp the Dahlia Collage Stamp from Stampendous with Versamark and heat emboss with WOW white embossing powder.
Sprinkle a little bit (you can always add more later!) red, yellow and orange Nuance powders over the flower image parts, and blue, purple and green Nuance powders on the parts surrounding the flower.  No worries if they overlap each other a little.
Mist it with water until the colors are blending, and add more powder in places if necessary. 
TIP: Cover it with household wrap and leave to dry. 
Add some extra color to the images itself to make them pop a litlle, with aquamarkers or watercolor pencils. 


I am entering this in the challenge on : 
1, The Flower Challenge - use your newest stamp or die

Friday, February 8, 2019

Dahlia flower stamp ... a TIP... 2!


Kleuren met Nuance poeders..  methode 1 (volgende keer methode 2)
Stempel de Dahlia collage stempel van Stampendous met Versamark en heat emboss het met WOW wit embossing poeder.
Sprenkel de Nuance poeders over de afbeelding (liever eerst weinig)... rood, geel en oranje (zo ongeveer) over de bloemen en blauw, paars en groen over de gedeeltes om de bloem heen.
Let er wel op dat je de complementaire kleuren niet over elkaar aanbrengt anders krijg je bruinerige kleuren!
Spray het met water, zodat de kleuren opgelost zijn en gaan mengen, maar ook weer niet te nat. Sprenkel er eventueel nog wat poeder bij waar het niet genoeg is.
Laat het aan de lucht drogen.
Breng met een aquarelmarker of -potlood iets meer kleur aan op de snijpunten van de afbeelding, om de afbeelding net iets meer te accentueren.

Coloring with Nuance powders .. method 1 (method 2 next time) 
Stamp the Dahlia Collage Stamp from Stampendous with Versamark and heat emboss with WOW white embossing powder.
Sprinkle a little bit (you can always add more later!) red, yellow and orange Nuance powders over the flower image parts, and blue, purple and green Nuance powders on the parts surrounding the flower.  No worries if they overlap each other a little.
Mist it with water until the colors are blending, and add more powder in places if necessary.
Leave it to dry.
Add some extra color to the images itself to make them pop a litlle, with aquamarkers or watercolor pencils. 


****

I am entering this in the challenge on : 
1, The Flower Challenge - use your newest stamp or die

Friday, December 14, 2018

Reminder TIMI Challenge December

This is a reminder post for the TIMI Challenge of December.

Go join in the fun!! 

The winner will get a stamp/stencil/die bundle from Altenew:
2 stamp sets + 1 stencil + 1 die set.

My inspiration ATC is using structure paste as a resist: the stamp is from Indigoblu

I'd like to enter this in the challenge on
1. bbb challenges - resist technique

Monday, February 26, 2018

2018 #3 Watercolours with EEA {by Ellie Knol}

2018 Topic 3: Watercolour

This also a book in my own series 52, a book a week! Week 8 - Book 8


 I'd like to share with you how to use  your beautiful watercolored paper. I LOVE how watercolor always make for beautiful backgrounds... 

I've altered a hard board baby book into a colorful booklet.. a feast for the eye. 


A picture I grabbed from the internet, to show you what it looks like: it has rather thick boards, which I liked for this purpose. 

These books (I have more) have been in my stash for quite a while, waiting for me to get the moment of light to create something with it. 
I removed all of the top (glossy) paper of the booklet, which leaves you with a blank booklet; you will now have to reinforce the spine with a piece of fabric.  


Before doing anything to change the booklet, I painted the outsides with Snowflake Fresco Finish paint, also the outside of the pages; closing it tightly first will help not getting any paint on the pages itself. Also make sure you add paint to the fabric on the spine.  


I've added pieces of shells which hang down with some knotted thread. The shells were colored with a bit of alcohol ink.

I've added structure paste randomly to the spine to cover the fabric partially. It gives it some structure and covers the part where I attached the threads with knots; makes it look as if it's supposed to look like this, hehe.  


The stencil with numbers PS021 and structure paste was used to make the no 1 on the spine.. you never know, I might want to create a second book in near future. 
I painted the number and spine yellowish (just here and there) with Yellow Submarine Fresco Finish Chalk Acrylic paint to match the yellow color in the background. 


OK.. this post was about watercolors.. right? 

I've created a larger piece of a background on watercolor paper with a technique where you use white glue to create a resist. Any pattern will do, and I experimented with stampiing with white glue, I used a stencil to create patterns, and splattered the glue as well... the sky is the limit here. 


Let the glue dry properly before adding color. I've used Ecoline in spraybottles, but any watercolor spray will do the job, or water-diluted transluscent Fresco Finish paints or even the normal watercolors. 


As you can see here, I've used salt in the wet watercolors to create little dots of color. 

Cut the background up to fit the pages and front and back cover of the booklet. 

I adhered it to the book with bookbinding glue. 


AND.. yes I had to use some stamping!! 
These beautiful and versatile stamps from Everything Art EEA01 are great for this. They're really great to add as background stamping. 
I've stamped it all with Archival black ink. 


I've added white highlights with a white acrylic marker around the stamping, and also in the background ! To me that adds the final touch!! 


A picture of the overall of the booklet. I would've liked to be able to photograph all sides at once, as I really LOVE how this has turned out.  


I especially like how the back cover has turned out.. the contrast between lighter and darker colors, but also the stamping around the edges. Guess what stamp I've used for that? Yes, part of the collaged stamp in set EEA01


****

I will teach 2 workshops early March at my home; 
... you can find details on my workshop blog: Kom spelen met papier, kleur en stempels!  

Sunday, September 10, 2017

Out and about with Magenta... a workshop from me...

WS0003 RESIST

I've made a new workshop, called WS0003 RESIST,
to be taught here at my house;
 I might have done a few sessions of it by the time
you read this post.  (it´s 21/8 today) .... 

It's always fun to teach workshops in making backgrounds and complete it with beautiful stamps! 
This is one of the samples I've made for the workshop, but the candidates can use any (Magenta) stamps after making the background.
There's different extra's too, different colors, and tips to change it or make the technique work better. 
Still not sure what the substrate will be we will be working on .. I have to give that a think! 

3 stamps from Magenta featured here: 
https://www.magentastyle.ca/store/product_info.php?cPath=398_492&products_id=15401&osCsid=h9cdb269m24epmc4setf2j6k71 


Tuesday, September 6, 2016

ATC's can hold a lot of techniques - 6


For some basics on using stencils, I tried all sorts of techniques on ATC's.
Today the sixth one!

.
Here is how you make this background:
Position your stencil onto your cardstock and dab with white acrylic paint. Sponge with distress inks and stamp a script to finish it off.

****


Magenta products used:


Monday, September 7, 2015

Baby oil resist stamping..


We discuss a technique every month on the dutch STEMPEL-ATC Yahoo group, and Paula Kwakernaak came up with the idea of stamping with baby oil.

I am entering the above ATC in the challenge of
Simon Says Stamp Monday challenge - make it colorful.


 LOVE the subltle resist when stamping with baby oil!
WARNING - I think it's good to clean your stamp thoroughly after stamping with baby oil! 


 On most of the ATC's I sponged with various colors of distress ink.
I am entering above ATC in the challenge on Lost Coast challenges - single layer project


 On this one I used a custom made pearl spray. 


****
STAMPS USED form Magenta: (click on picture)
85.005

07.697

14.641