Showing posts with label adirondack. Show all posts

Monday, August 7, 2017

Playing with Minx Shimmering Inks - no 6

Remember these posts Playing with Minx -4 
and 
Playing with Minx - 5 

Remember that, on an old table: using a bucket of water and paper, and of course ... Minx,
I created a whole bunch of backgrounds?? 

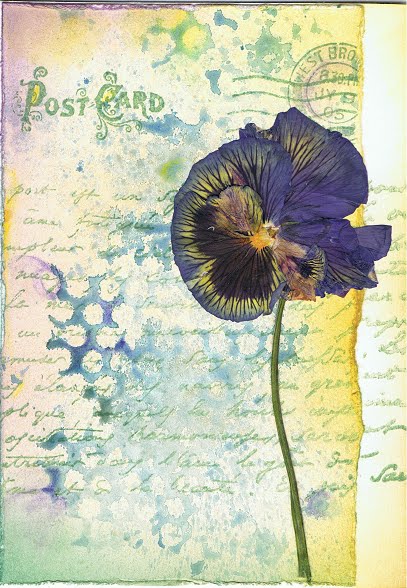
Today's post features the beautiful vibrancy of the Minx Shimmering Inks.
 The background on canvas paper.. still wet but drying in the sun!

Later on, I discovered that I must have dropped some water on it by mistake, as it had more drops than showing on this photo... that's part of the fun!
I had to be everywhere, because the robot lawnmower wanted to mow over my backgrounds sometimes, hehe.


I wanted to enhance the drops, so I did not cover it up, but overstamped and used the background as part of the images.
Don't forget.. there is a Snapguide at the end of this post, showing the steps to achieve the finished card.

A close-up: watch the droplet... with the inks all pushed to the edges of it. I think that's magic... I couldn't have painted it that way!

****
 Now for the second background:  very different paper, but a beauty too!


I cut it to size...

... and created this:

  
I sponged these tiny dots from the Lotus Stencil around the edge.


...for step-by-steps of this second card too, please see the Snapguide.

****

Art Anthology Products Used:


Saturday, May 18, 2013

Seahorse tag... a step-by-step

 
Today a step-by-step to make this tag.
As you will see the tag has been created in a process. Trial and error, and go with the flow.
*****

Apply gesso randomly to a tag. Leave to dry.

Sponge over it with the shown colors of Adirondack inks. Splatter with water, and dab with a dry cloth. 


Stamp some shells and text with the colors Pool and Citrus. Heat emboss it with clear embossing. I had a happy accident here, part of the sponging wasn't dry yet, so it gives part of the tag some shimmer. 

 
Heat emboss the seahorse with black embossing powder. Do some black stamping ( text and branches). As you can see in the next picture I took the black stamped shell away with some Stazon cleaner. (Luckily this was not a problem because this part of the tag was covered with clear embossing). 

 
At this stage I decided the tag needed a bottom, so I tore it and adhered it again to show the torn edge, Stamp shells onto seperate paper, color and cut it out. I made some bubbles by circling some of the white dots from the water splatters with a greyish watercolor-pencil. 

 
Adhere the shells to the tag, color some thread. Finish the tag off as shown. 

 
A close-up.


****
STAMPS USED: (click on picture)

Thursday, December 15, 2011

Pre-launch party Hero Arts at Art Journey

I attended a pre-launch party at Art Journey last night. It was fun, we
made these cards!
 

****


****

Saturday, October 1, 2011

Katzelkraft day for me again...


I used the stampset Physalis kzt5302 from Katzelkraft for this background.
I actually liked how the background turned out, so I decided not to cover it up with something big - that's when I started thinking of making some buttons...

This card has got a little sister, an ATC, which I made from a leftover from the background. Yes, you're right, I always make my backgrounds bigger than I need, so I can make some embellishments, and if possible, an ATC. 


HOW TO:
Stamp the swirls and butterflies on white cardstock with Versamark and heat emboss with clear embossingpowder.
Sponge the background with Adirondack Brights #Citrus and #Sunshine Yellow.
Stamp swirls and butterflies randomly with the same colors.
Paint the background with white acrylic paint (with a stubborn paintbrush). When it's nearly dry, cover it with a scrap piece of paper and rub over it. Remove the paper - it will cause that beautiful vintage effect, the lines in the acrylic paint. Leave it to dry thoroughly.
Put a clean piece of paper over the whole background, and iron off the embossing. It will reveal the background colors.
Sponge the background - with Distress ink #Rusty hinge, Adirondack Brights #Butterscotch and #Meadow-  to accentuate the butterflies and swirls.To whiten the parts covered with the acrylic paint, wipe it with a damp cloth.
Distress the edges with a paper distresser, and distress with Distress ink #rusty hinge.
Make three buttons from a leftover piece of the background,  (I used cardboard). To get the buttons glossy, put some glossy accents on it. Leave to dry.

Attach the buttons to the background with some coordinating colors of ribbon. Attach the background to a card.

I hope you can use this technique - I love to use it!

Have a nice weekend, with a lot of stamping pleasure!


Thursday, August 18, 2011

Card with TAG

I loved making this tag! I made it using the gesso-resist technique.
 Ik vond het leuk deze tag te maken, gemaakt volgens de gesso-resist techniek.


STAMPS USED:
Text - Stampers Anonymus


Wednesday, August 17, 2011

Make and Take bij Art Journey....

... afgelopen Zaterdag. Ik heb het iets anders gedaan dan Jeanette...
 
Sorry, this one is getting published ...  


STAMPS USED :
Boys - Art Journey

Tuesday, September 14, 2010

Lekker gekliederd met inkten / I played with inks

Gesponsd met inkten van Adirondack, de Denim, Rust en Citrus. De stempel is van Stampers Anonymus, en gestempeld met versamark en Ranger embossing Powder Clear. Na het sponzen heb ik de embossing er weer afgestreken, tussen twee vellen papier.
****
I sponged with inks from Adirondack, the colors Denim, Rust and Citrus. The stamp is from Stampers Anonymus. I embossed the stamp wth Ranger Embossing Powder Clear, and after sponging, I removed it with an iron between two sheets of paper. 

Monday, September 13, 2010

Kaart gemaakt bij Art Journey Zaterdag

De stempels zijn van een nieuwe sheet van ART JOURNEY
****
The stamps are from a new sheet of ART JOURNEY.   

Monday, August 23, 2010

Saturday, April 17, 2010

Precious Moments

  
De stempels zijn van Art Journey.  
****

The stamps are from Art Journey.