Showing posts with label Stampers Anonymous. Show all posts

Tuesday, December 18, 2018

YOU...


Ik heb gisteren heerlijk zitten spelen met de prachtige stempels van Dina Wakley. Je kunt ze voor zoveel creaties gebruiken... ik heb het tot nu toe gebruikt voor een kaft van een boek, op kaarten en ook in mijn art journals.
Het woordje YOU komt van de Soul & Heart stempelset van Dina Wakley
De basis van deze dubbele pagina is een restachtergrond van het afbrayeren van  Paper Artsy Fresco Finish Paint. 


I had fun playing in one of my art journals yesterday with the stamps from Dina Wakley. They are so versatile... I've been using it on a book cover, on cards and on art journal pages.
The word YOU is from the Soul & Heart stampset from Dina Wakley. 
The base of the double page is a brayer cleanup paper from Paper Artsy Fresco Finish Paint. 


De insekten (Stampers Anonymus) stempelde ik op vloeipapier en heb het erop erop geplakt met decoupage lijm. 
De insects (Stampers Anonymus) were stamped onto tissue paper and collaged onto the pages with decoupage glue. 
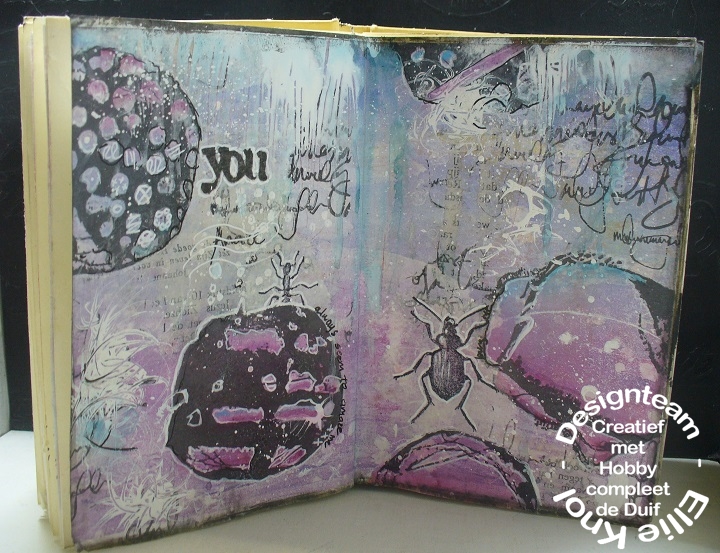


 Ik hoop dat je het mooi vindt, en inspiratie vol..

Hope you like it! And got some inspiration to just play when art journaling. 

Monday, June 18, 2018

"I see you "


Breng een aantal kleuren distress oxides aan op een Gelliplate; spray met een heel klein beetje water. Brayer erover om de kleuren iets te mengen.
Maak een achtergrond door Distress Oxides op cardstock te brayeren. 


Gebruik deze achtergrond nu; uiteraard kun je het inkt op de Gelliplate goed gebruiken voor nog een achtergrond oid. 
Leg de stencil Eye Contact van Visble Image erop en spons met Distress inkt Ground Espresso. Draai de stencil om en spons een 2e oog zoals op het voorbeeld.

Maskeer het oog en stempel eromheen met Stazon Timber Brown met de script van de Stampers Anonymus Entomology set, en ook een insect ervan.


Breng kleur aan in het oog met aquarelpotloden. Breng witte accenten aan met een acrylmarker Extra Fine Point van Sharpie.

Friday, May 18, 2018

Lekker spelen met stencils, Nuance en washi tape ..

Je kunt nog steeds meedoen met de challenge bij Hobbycompleet De Duif in de maandelijkse challenge. De thema is : gebruik een stencil en washi tape. 

Ik maakte dit voorbeeld: 


Ik gebruikte hier de Nuance van Magenta, stencil van TCW en de insecten van Stampers Anonymus... de Entymology set. En de tape is ook van Ranger.


Leg de Crafter's Workshop Template 6"X6"
Elliptic op je kaartkarton en breng Ranger Crackle
Texture Paste aan met een paletmes.
Goed laten drogen. Maak een tweede vierkantje in het middenmet dezelfde stencil en structuurpasta.
Goed laten drogen. 


Sprenkel een beetje Nuance poeder van Magenta,in de kleuren MNU003 en MNU004 op hetkaartkarton en spray met water.Laten drogen.

Plak er stukjes transparant tape (washi tape) over.


 Stempel 2 insecten van de stempelset Stampers
Anonymus ‘entomology’ op vloeipapier en plakhet erop met decoupage lijm.


Wanneer alles goed droog is, breng witte accentenaan met een Sharpie Extra Fine Point Poster Paint Marker,en zwarte accenten met een zwarte watervaste marker. 

Kleur de insecten met een aquarelpotlood

Friday, May 4, 2018

TIMI challenge for May 2018


New challenge for the Craft Stamper, it's an anything goes, with stamping of course. 
AND remember : only one creation in your blogpost!

Go check it out on the challenge page, stamps to be won! 

For this background I have used Kate Crane inspiration :) 


****
a second card: 


This was the whole background; I cut it up in two pieces: 


Friday, April 6, 2018

TIMI challenge for April 2018

Another month has flown by, so time for a new TIMI challenge:

Inchies of leftover backgrounds always make a gorgeous base for cards. 
Finish it off with a stamped imagen as a focal point!

I've used stamps from Stampers Anonymus (circles) and Hero Arts (butterfly and script) 


There's a gorgeous prize, so go check it out and join in the challenge.. any stamped creation will do. 


Friday, March 2, 2018

Wednesday, February 7, 2018

Book 5 - for series 52


week 5 : book 5. 

This time a booklet from 17 envellopes.. 

It measures 12 x 18,5 centimeters. 


The envellopes can be used as pockets to keep photographs, or labels, or anything that you'd like to save as a keepsake. 


This is really a way to bind that I've come up with all by myself.. trial and error made it perfect in the end. I might come up with a workshop about making it, so I will not share more details about it.

AND remember... this series is about me, and myself, and not for a DT, so bare with me not sharing too much info anyway.


Hope you like it!!

Please leave a comment if you do.. that inspires me to make more :)

I am entering this in the challenge on:

1 Happy Little Stampers - butterflies
2. A vintage Journey - melt it
3. Mini Album Makers 


Thursday, May 25, 2017

Art Journaling is playing!

I'm up on the Art Anthology website again today.. playing in my art journal.. with the beautiful Velvet paints and Colorations spray.. and with a brand new stencil.


I LOVE to play in an Art Journal ... WHY ?? I can just play.. that's why..no rules, no wrongs.. and a lot af trial and sometimes error, smile...


****
 Using structure paste and the new stencil designed by Marleen van Meerendonk can only be a party.. it's great all by itself.


 I am in LOVE with Kona Velvet paint... It adds so much depth!


 The finished double page!!


....and some close-ups..

The sun was shining on my photography box
.. hence the glow at the top of the photo.        

Such beautiful detail with these paints and stencil!


....for more pictures and a step-by-step tutorial please have a look at the
Snapguide tutorial I've created for you!

Check out How to Play in Your Art Journal With Paints and Stencils by Art Anthology on Snapguide.

Have a play and show it to us on our Facebook group
Art Anthology’s Adventures in Art !

SEE you! 

Thursday, May 4, 2017

Home decor time !


I am happy to be with you today sharing a piece of home decor 
made with the beautiful Colorations Sprays and a stencil from Art Anthology. 


I think this will be gifted to someone in near future; only if I can part with it, lol!


I am entering this in the challenge on Simons Says Stamp - the great ourdoors

****

Starting off with a slab of wood...


... and playing with gesso, ephemera, structure paste and a stencil ....


... and some Colorations Sprays ...


... will give you an artsy gift!

I'm happy I could share this with you and I hope you will give this a try.

I've also created a step-by-step Snapguide tutorial for you:

Wednesday, February 15, 2017

A color I don't choose that often..

On a Facebook Group I am on, we had to use a color we don't use often, and a seahorse on the project. 
I went for the gorgeous seahorse stamp from Designs By Ryn of course... and the color you won't see me use much is violet.
Actually, I discovered that there is no color I don't like at all.
I LOVE violet in combination with blues, as colors in Hydrangeas are really a favorite of mine, how couldn't it be!?! 

So, to be true, this was a real challenge for me, colorwise.  


The coloring has been done with Nuance from Magenta.. Black, and Violet... The blue has been added with a watercolor pencil, just a hint of it!
The bubbles are also from Designs By Ryn. 
The stamp I heat embossed in whoite is from Stampers Anonymus, an alltime favourite as far as I am concerned. 


Friday, December 30, 2016

Colorations spray on glass?! YES!

I am on the Art Anthology blog again today, with a tutorial recycling some glass candle holders with Colorations inksprays, YES, on glass!!

Find out how in this post, and for a tutorial go see the Snapguide at the end of the post.


Here you can see the finished project as it looks during the day.
To begin with, I bought this as a whole on a flea market, with the glass being uncolored.


I used Colorations, deli paper, gesso and a stamp.
Doesn't this look yummy?


Some detail of the colored paper (the backside) after it had dried. 


With the lights and the candles both on.


With the lights out and the candles on.


 Every photo I took gave some other detail of the beautiful colors, depending on the light around it, and whether the candles or on or not. 

**** 
For information on the Colorations sprays, go see the Art Anthology blog, where it's all listed with links. 
I've created a Snapguide tutorial for you, with a step-by-step of the creation of these candle holders with the beautiful Colorations (inkspray) from Art Anthology.

I hope you will give this a try...
it's always nice to have some candles burning at night
during the darker period of the year, isn't it ?!!

Thank you so much for stopping by today! 

Friday, September 30, 2016

Making some more fabric paper! YES really!


I've created another BIG background using this fabulous tutorial from Liesbeth Fidder for Paper Artsy.
Only thing I changed was I added some watered down gesso to mute the colors a bit, before adding the acrylics,and it's not autumnal themed. 

I captured some parts of it:


****
 9 inchies: 


****
I've made 7 cards of 10 x 10 pieces, and will use the other parts later on. 


Now I will need to experiment with the tutorial from Anneke as well... making fabric paper from tissue and delicate papers ... !! I think I need to use my new paints from Art Anthology for this as well, most of them have a beautiful shimmer, 

About the products I've used: 
Stencils from Art Anthology and Magenta,
script stamp from Hero Arts, 
diecuts from Simon Says Stamp, Stampers Anonymus and Memory Box, 
acrylic paints from Paper Artsy and Golden.